How To Draw A Kangaroo – advanced drawing
Drawing a highly detailed and realistic pencil artwork, like my kangaroo drawing, requires patience, precision, and a solid understanding of shading, texture, and composition. In this guide, I will take you through the entire process step by step, ensuring that even beginners can follow along and develop their drawing skills.
Materials You’ll Need
To achieve a highly detailed graphite drawing, you will need:
Graphite Pencils: A set ranging from 2H (for light sketching) to 8B (for deep shadows). A mechanical pencil (0.5mm or 0.3mm) can also be helpful for fine details.
High-Quality Paper: Choose smooth or medium-textured paper, such as Bristol Board or Fabriano Artistico, which allows for fine detail while holding graphite well.
Erasers: A kneaded eraser for subtle highlights, a precision eraser (such as a Tombow Mono Zero) for fine details, and a standard eraser for larger areas.
Blending Tools: Blending stumps, tissue paper, and soft brushes for smooth shading transitions.
Grid Tools: A ruler and a printed grid overlay for accurate scaling.
Sharpener and Sandpaper Block: Keeping a sharp point on your pencils is essential for fine details like fur.
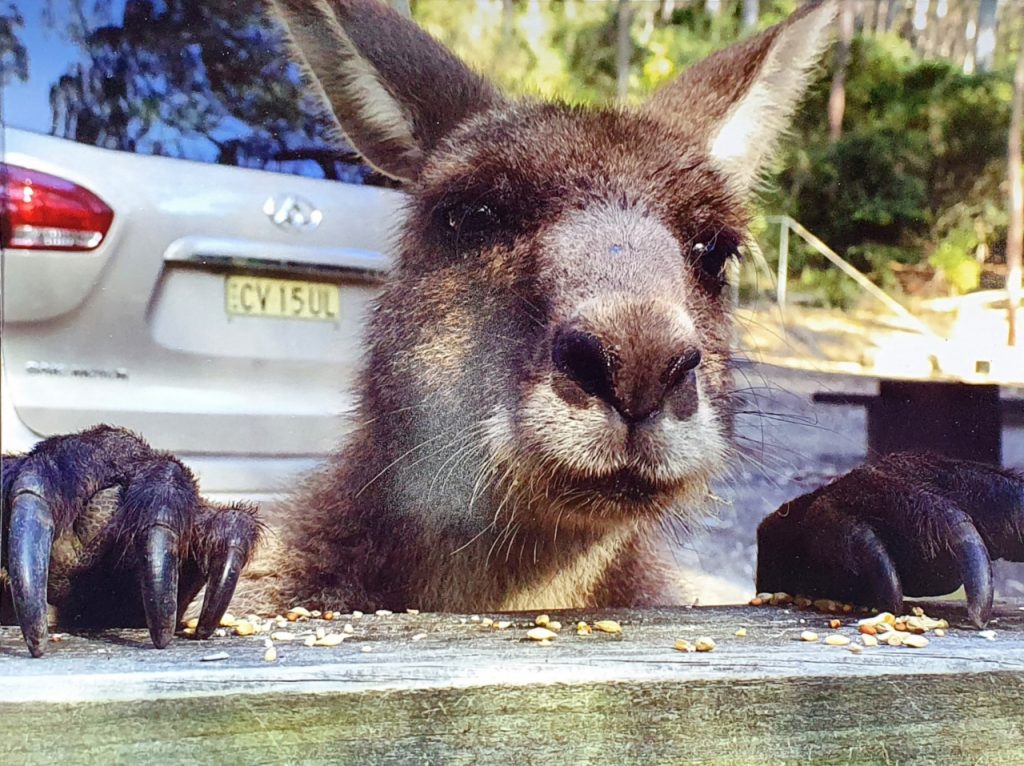
Choosing a Strong Reference Image
A high-quality reference image is crucial for realism. Here’s what to look for:
Sharp Focus: The image should have clear details, especially around textures like fur, eyes, and shadows.
Well-Balanced Lighting: Good lighting helps define highlights and deep shadows for a full range of tones.
Engaging Composition: Choose an image with a compelling perspective—such as a close-up angle that captures expression and texture.
Personal Connection: If possible, use your own photographs or a unique perspective to add originality to your drawing.
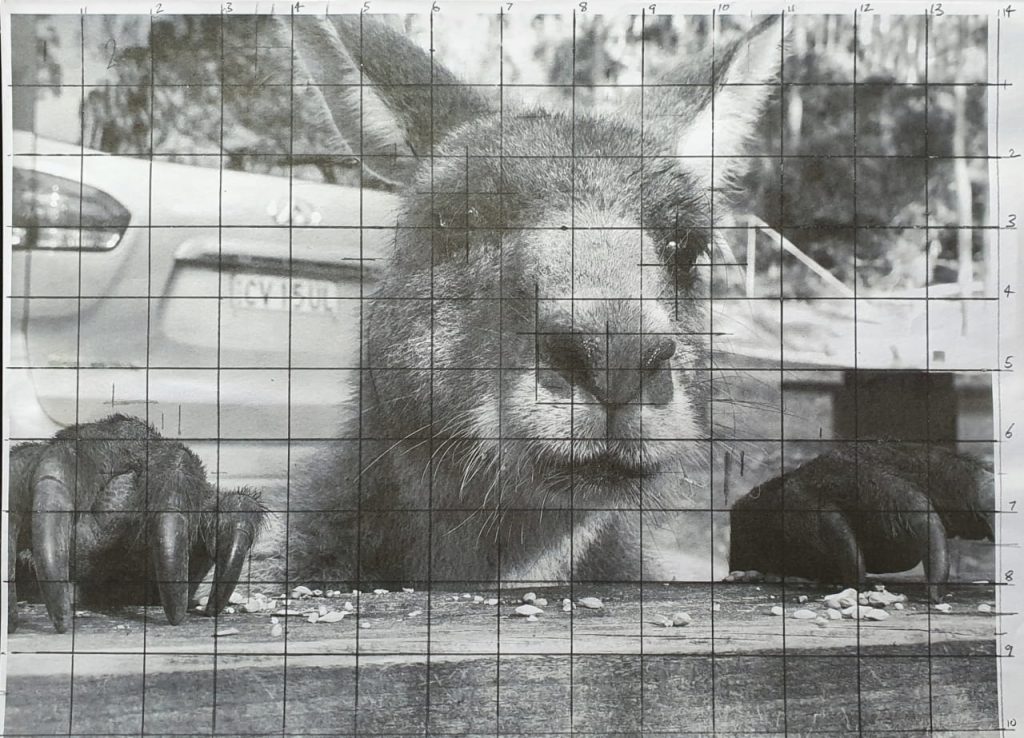
Transferring the Image with the Grid Method
If you want to enlarge your drawing while keeping proportions accurate, the grid method is an excellent tool.
Draw a Light Grid: Print your reference image and overlay a light grid (e.g., 1cm squares). Use an HB pencil to keep lines subtle.
Scale Up Proportionally: On your drawing paper, lightly draw a matching grid with larger squares if you are enlarging the image.
Sketch Within Each Square: Focus on transferring shapes one square at a time rather than the entire image at once. This simplifies the process and maintains accuracy.
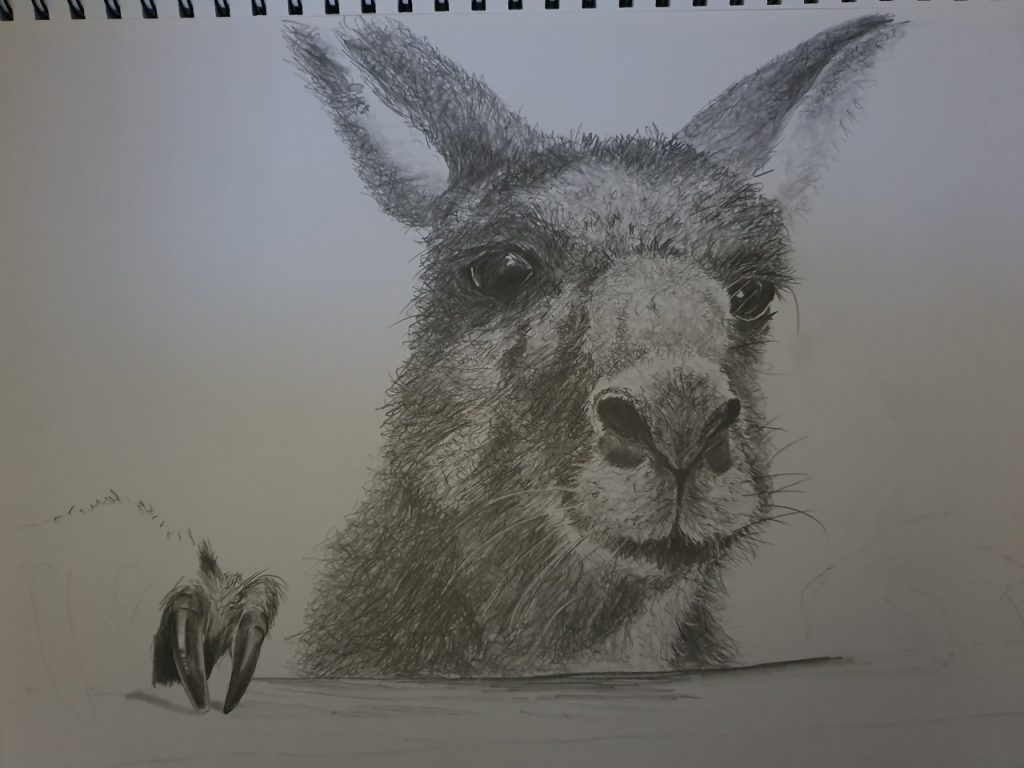
Initial Sketch and Fur Texture Guide
Once your grid is in place, begin your sketch with light, precise lines.
Start with the key features such as the eyes, nose, and ears, ensuring correct proportions.
Use an H or HB pencil to sketch lightly, so mistakes can be easily corrected.
Avoid pressing too hard, as deep indentations can be difficult to erase.
How to Draw Fur in Layers
Drawing fur realistically requires understanding how to layer and vary strokes to mimic the natural flow of hair.
Direction Matters: Always observe the direction of the fur growth in your reference image. The strokes should follow this flow.
Start Light: Use an H or HB pencil to create faint guidelines indicating the fur’s direction and texture.
Short, Controlled Strokes: Use a sharp pencil and apply short, flicking strokes that taper at the end. Vary the length and pressure to mimic natural variation.
Layering for Depth: Build layers gradually, moving from lighter pencils (H, HB) to darker tones (2B, 4B, 6B). The goal is to create a sense of overlapping hairs.
Fine Details with a Mechanical Pencil: A 0.3mm mechanical pencil is excellent for adding tiny, individual strands of fur in highlighted areas.
Understanding Tonal Values and Blending
Achieving realism relies heavily on tonal variation. Here’s how to approach it:
Identify Light and Dark Areas: Observe your reference image and lightly mark the darkest shadows and brightest highlights.
Block in Shadows First: Use a 2B pencil to shade in the darkest areas with a light touch. Increase depth gradually.
Smooth Blending for Realism: Use a blending stump or tissue paper to softly blend mid-tones. Avoid over-blending, as fur should retain some texture.
Create Highlights by Lifting Graphite: Use a kneaded eraser to gently lift highlights. Press and twist the eraser rather than rubbing.
Refining the Contrast: Go back in with 4B or 6B pencils to deepen shadows and define details further.
How to Use a Blending Stump Effectively
For Soft Transitions: Lightly blend areas like the snout, ears, and background where the fur is less defined.
For Controlled Blending: Use a clean stump in small circular motions to smooth pencil strokes while maintaining texture.
For Adding Detail: A blending stump can also be used to create soft fur effects by gently dragging graphite outward.
Refining the Eyes and Nose
The eyes and nose are focal points, so extra care is needed.
Eyes: Start by shading the iris and adding a clear highlight. Blend gently for realism and darken the pupil with a 6B or 8B pencil.
Nose Texture: The nose often has a leathery texture. Use a stippling technique (tiny dots) combined with subtle blending to achieve this effect.
Reflections: Use a precision eraser to lift highlights in the eyes and nose, giving them a glossy, wet look.
Finishing Touches and Background Work
Refine Edge Details: Go over the edges of the drawing to sharpen details and create contrast.
Enhance Fur Depth: Add final strands of hair with an H pencil for light areas and a 6B pencil for darker sections.
Adjust Overall Contrast: Step back and assess if the light and dark areas are well balanced. Increase shading where necessary.
Lightly Shade the Background: A soft background gradient can make the subject pop while maintaining a natural look.
Final Thoughts
Drawing a highly detailed, realistic piece takes time, patience, and attention to detail. By following these steps—choosing the right materials, using a strong reference, building layers of fur with precise strokes, and mastering tonal values—you can create a stunning graphite drawing that captures lifelike texture and depth.

My realistic kangaroo portrait drawing – completed using graphite pencils, an eraser, and blending stumps.
Would you like a follow-along video tutorial for this technique? Let me know in the comments!